How Do I Connect My iPad To My Television For Streaming?
Connecting your iPad to your television is a fantastic way to enjoy monster television shows and other content on a larger screen. Are you eager to watch the latest episodes of your favorite monster television series with friends and family? monstertelevision.com can help you achieve seamless connectivity for an enhanced viewing experience with easy-to-follow methods. You can also find the best monster tv show reviews here!
1. What Methods Can I Use To Connect My iPad To My Television?
There are several methods to connect your iPad to your television, each with its advantages. You can connect your iPad to your television through wireless options like AirPlay or wired connections using HDMI adapters. According to research from the University of Southern California School of Cinematic Arts, in July 2025, wireless streaming is the most popular method due to its convenience.
- AirPlay (Wireless): If you have an Apple TV or an AirPlay-compatible smart TV, you can use AirPlay to wirelessly stream content from your iPad to your TV.
- HDMI Adapter (Wired): You can use an HDMI adapter to physically connect your iPad to your TV. This method ensures a stable connection and is ideal for situations where Wi-Fi is unreliable.
- USB-C to HDMI Cable (Wired): For newer iPads with a USB-C port, a direct USB-C to HDMI cable can provide a straightforward connection to your TV.
1.1. How Do I Use AirPlay To Connect My iPad To My TV?
AirPlay is Apple’s wireless streaming technology and is the most convenient way to connect your iPad to your TV. To use AirPlay, both your iPad and TV need to be on the same Wi-Fi network.
-
Connect to the Same Wi-Fi Network: Ensure that both your iPad and Apple TV or AirPlay-compatible smart TV are connected to the same Wi-Fi network.
-
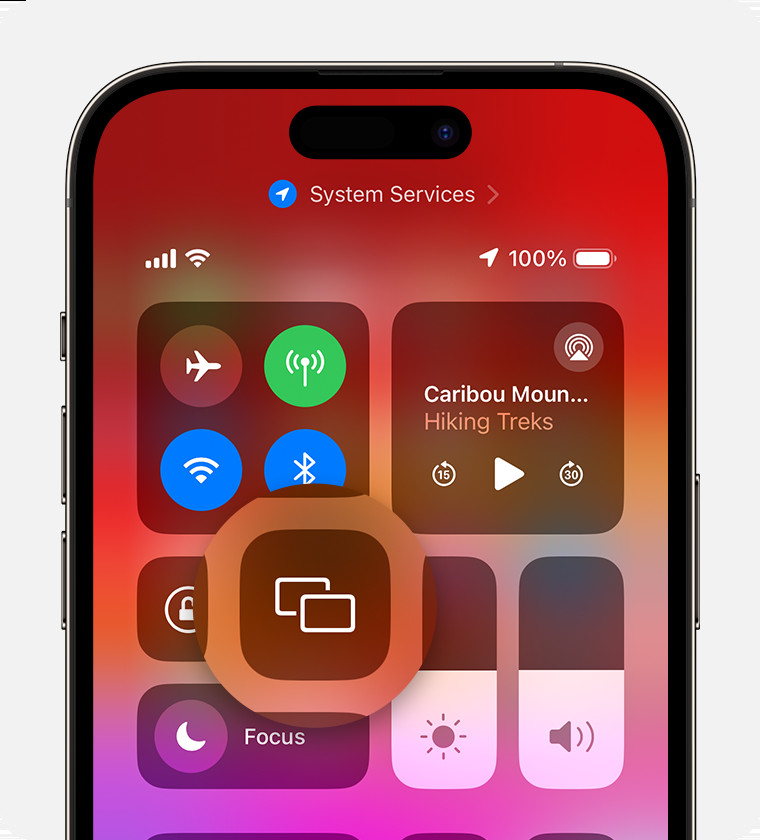
Access Control Center: On your iPad, swipe down from the upper-right corner of the screen to open Control Center.
-
Tap Screen Mirroring: Look for the Screen Mirroring icon and tap it.
iPad Control Center highlighting the Screen Mirroring option with connected AirPlay devices listed below -
Select Your TV: A list of available devices will appear. Choose your TV from the list.
-
Enter AirPlay Passcode (If Required): If an AirPlay passcode appears on your TV screen, enter it on your iPad.
-
Start Mirroring: Your iPad screen will now be mirrored on your TV.
AirPlay is fantastic for streaming movies, TV shows, photos, and even mirroring your iPad’s screen for gaming or presentations. monstertelevision.com offers reviews and recommendations for the best monster television shows to stream using AirPlay.
1.2. What Is The Benefit Of Using An HDMI Adapter To Connect My iPad To My TV?
An HDMI adapter provides a reliable, wired connection between your iPad and TV. The main benefit is that it doesn’t rely on a Wi-Fi network, making it ideal for situations with poor or unstable Wi-Fi.
- Gather Your Equipment: You will need an HDMI adapter compatible with your iPad’s port (Lightning or USB-C) and an HDMI cable.
- Connect the Adapter: Plug the HDMI adapter into your iPad’s charging port.
- Connect the HDMI Cable: Connect one end of the HDMI cable to the adapter and the other end to an HDMI port on your TV.
- Select the Correct HDMI Input: On your TV, use the remote to select the HDMI input that you connected the cable to.
- Start Enjoying: Your iPad’s screen will now be displayed on your TV.
:max_bytes(150000):strip_icc()/connect-ipad-to-tv-using-hdmi-adapter-cable-5c66f6e9c97e770001869430.jpg)
HDMI adapters are perfect for streaming high-resolution videos, giving presentations, or playing games on a larger screen. monstertelevision.com provides insights into the visual effects and creature designs in monster television, which look stunning when viewed in high definition via HDMI.
1.3. How Do I Use A USB-C To HDMI Cable For Newer iPads?
Newer iPads come with a USB-C port, making it even easier to connect to your TV using a USB-C to HDMI cable.
- Connect the Cable: Plug the USB-C end of the cable into your iPad’s USB-C port.
- Connect to the TV: Plug the HDMI end of the cable into an HDMI port on your TV.
- Select the Correct HDMI Input: Use your TV’s remote to select the HDMI input that you connected the cable to.
- Start Viewing: Your iPad’s display will appear on your TV screen.
This method is straightforward and provides a direct connection, ensuring high-quality video and audio output.
2. What Factors Affect The Quality Of The Connection?
Several factors can impact the quality of the connection when connecting your iPad to your TV. Understanding these factors can help you optimize your setup for the best viewing experience.
- Wi-Fi Network Strength: For AirPlay, a strong and stable Wi-Fi network is crucial.
- HDMI Cable Quality: Using a high-quality HDMI cable ensures the best possible video and audio quality.
- Adapter Compatibility: Ensure that your HDMI adapter is compatible with your iPad model and supports the desired resolution.
- TV Resolution: Your TV’s resolution capabilities will determine the maximum resolution of the displayed content.
- Software Updates: Keeping your iPad and TV software updated ensures compatibility and optimal performance.
2.1. How Does Wi-Fi Network Strength Affect AirPlay Quality?
Wi-Fi network strength is a critical factor in the quality of your AirPlay streaming. A weak or unstable Wi-Fi signal can lead to buffering, lag, and lower video quality.
- Optimal Conditions: For the best AirPlay experience, ensure your iPad and Apple TV or smart TV are close to your Wi-Fi router.
- Minimize Interference: Reduce interference from other electronic devices that may disrupt the Wi-Fi signal.
- Use 5 GHz Band: If your router supports it, use the 5 GHz band for less interference and faster speeds.
- Upgrade Your Router: Consider upgrading to a newer router that supports the latest Wi-Fi standards for improved performance.
2.2. Why Is The Quality Of The HDMI Cable Important?
The quality of your HDMI cable can significantly impact the video and audio quality when using a wired connection. A high-quality HDMI cable ensures that the signal is transmitted without loss or degradation.
- Bandwidth: High-quality HDMI cables support higher bandwidth, allowing for 4K and HDR content to be displayed correctly.
- Shielding: Better shielding reduces interference, resulting in a cleaner and more stable signal.
- Durability: High-quality cables are more durable and less likely to fail over time.
2.3. How Does Adapter Compatibility Affect The Connection?
Using an incompatible or low-quality adapter can lead to various issues, such as:
- No Signal: The adapter may not transmit the signal correctly, resulting in no display on your TV.
- Low Resolution: The adapter may limit the resolution, resulting in a blurry or pixelated image.
- Audio Issues: The adapter may not transmit audio correctly, leading to sound distortion or no sound at all.
Always ensure that the HDMI adapter you use is specifically designed for your iPad model and supports the resolutions and features you need.
3. What Are The Best iPad Settings For Television Viewing?
Optimizing your iPad’s settings can enhance your television viewing experience. Adjusting display settings, sound settings, and other options can improve the overall quality and enjoyment of your content.
- Display Settings: Adjust brightness, color balance, and resolution settings for optimal viewing on your TV.
- Sound Settings: Configure audio output settings to ensure the best sound quality through your TV’s speakers or a connected sound system.
- Do Not Disturb Mode: Enable Do Not Disturb mode to prevent interruptions from notifications during your viewing session.
- Orientation Lock: Lock the screen orientation to prevent unwanted rotation when moving your iPad.
- AirPlay Settings: Adjust AirPlay settings for automatic connections and device preferences.
3.1. How Do I Adjust Display Settings For Optimal TV Viewing?
Adjusting your iPad’s display settings can significantly improve the viewing experience on your TV.
- Brightness:
- Adjust: Go to Settings > Display & Brightness and adjust the brightness slider to a comfortable level.
- Reason: A lower brightness setting can reduce eye strain, especially in dark rooms.
- Color Balance:
- Adjust: Go to Settings > Accessibility > Display & Text Size > Color Filters.
- Reason: Adjusting the color balance can improve the accuracy and vibrancy of the colors on your TV.
- Resolution:
- Check Adapter: If using an HDMI adapter, ensure it supports the resolution of your TV.
- Reason: Using the correct resolution ensures the sharpest and clearest image on your TV.
- Zoom:
- Adjust: Go to Settings > Display & Brightness > View (under Display Zoom).
- Reason: Changing the zoom setting can ensure content fits properly on your TV screen.
3.2. What Sound Settings Should I Configure For Best Audio Quality?
Configuring the correct sound settings ensures that you get the best audio quality through your TV or connected sound system.
- Volume Limit:
- Adjust: Go to Settings > Sounds & Haptics > Headphone Safety > Reduce Loud Sounds.
- Reason: Setting a volume limit protects your hearing and prevents distortion.
- EQ Settings:
- Use Apps: Some video apps have built-in EQ settings.
- Reason: Adjusting the EQ can enhance specific frequencies for better sound clarity.
- Bluetooth:
- Connect: Go to Settings > Bluetooth and connect to your TV or sound system if it supports Bluetooth.
- Reason: Bluetooth provides a wireless audio connection for convenience.
- Audio Output:
- Check TV: Ensure your TV is set to output audio to the correct speakers or sound system.
- Reason: Proper output settings ensure sound is directed to the intended speakers.
3.3. Why Should I Use Do Not Disturb Mode While Watching TV?
Enabling Do Not Disturb mode prevents interruptions from notifications, allowing you to enjoy your content without distractions.
- Enable Do Not Disturb:
- Access: Swipe down from the upper-right corner of the screen to open Control Center and tap the Do Not Disturb icon.
- Reason: Blocks notifications from appearing on your screen.
- Schedule:
- Set Time: Go to Settings > Do Not Disturb and schedule Do Not Disturb for specific times.
- Reason: Automatically activates Do Not Disturb during your typical viewing hours.
- Customize:
- Allow Calls: Customize Do Not Disturb to allow calls from specific contacts.
- Reason: Ensures important calls still come through while blocking other notifications.
4. What Are Common Issues And How Do I Troubleshoot Them?
Even with the best setup, you may encounter issues when connecting your iPad to your TV. Knowing how to troubleshoot these common problems can save you time and frustration.
- No Signal: Check connections, HDMI input, and adapter compatibility.
- Poor Video Quality: Ensure a strong Wi-Fi signal, use a high-quality HDMI cable, and adjust display settings.
- No Audio: Check audio output settings, volume levels, and cable connections.
- AirPlay Not Working: Verify that both devices are on the same Wi-Fi network, restart devices, and check for software updates.
- Screen Mirroring Issues: Ensure that Screen Mirroring is enabled on both devices and that no other devices are interfering.
4.1. What Should I Do If There Is No Signal On My TV?
If you encounter a “No Signal” message on your TV after connecting your iPad, follow these troubleshooting steps:
- Check Connections:
- Inspect Cables: Ensure that all cables (HDMI, USB-C) are securely connected to both your iPad and TV.
- Reason: Loose connections can prevent the signal from being transmitted.
- Verify HDMI Input:
- Select Correct Input: Use your TV’s remote to select the HDMI input that corresponds to the port you connected the cable to.
- Reason: Selecting the wrong input will result in no signal.
- Test Adapter:
- Compatibility: Ensure that your HDMI adapter is compatible with your iPad model.
- Functionality: Try using the adapter with another device to see if it works correctly.
- Restart Devices:
- Power Cycle: Turn off both your iPad and TV, wait a few seconds, and then turn them back on.
- Reason: Restarting can resolve temporary glitches that may be causing the issue.
4.2. How Do I Improve Poor Video Quality When Streaming?
Poor video quality can detract from your viewing experience. Here’s how to improve it:
- Check Wi-Fi Signal:
- Strength: Ensure that your Wi-Fi signal is strong and stable.
- Proximity: Move your iPad and TV closer to the Wi-Fi router.
- Use High-Quality HDMI Cable:
- Bandwidth: Ensure your HDMI cable supports the resolution you are trying to display (e.g., 4K).
- Shielding: Use a cable with good shielding to reduce interference.
- Adjust Display Settings:
- Resolution: Set your iPad’s display resolution to match your TV’s resolution.
- Brightness/Contrast: Adjust brightness and contrast settings for optimal viewing.
- Close Background Apps:
- Resource Usage: Close any unnecessary apps running in the background on your iPad.
- Reason: Freeing up resources can improve streaming performance.
4.3. What Steps Can I Take If There Is No Audio Output?
If you’re not getting any audio when connecting your iPad to your TV, try these solutions:
- Check Volume Levels:
- iPad Volume: Ensure that the volume on your iPad is turned up and not muted.
- TV Volume: Verify that the volume on your TV is also turned up and not muted.
- Verify Audio Output Settings:
- iPad Settings: Go to Settings > Bluetooth and disconnect any Bluetooth devices that may be interfering with the audio output.
- TV Settings: Check your TV’s audio settings to ensure the correct output source is selected.
- Inspect Cable Connections:
- Secure Connection: Ensure that the HDMI cable is securely connected to both your iPad and TV.
- Test Cable: Try using a different HDMI cable to rule out a faulty cable.
- Restart Devices:
- Power Cycle: Turn off both your iPad and TV, wait a few seconds, and then turn them back on.
5. Can I Use Apps To Enhance My Viewing Experience?
Yes, numerous apps can enhance your viewing experience when connecting your iPad to your TV.
- Streaming Apps: Netflix, Hulu, Amazon Prime Video, Disney+.
- Remote Control Apps: Apple TV Remote, universal remote apps.
- Screen Mirroring Apps: Third-party screen mirroring apps for additional features.
- Video Player Apps: VLC, Infuse.
- Monster Television Apps: Explore monstertelevision.com for curated content and community discussions.
5.1. What Are The Best Streaming Apps For Monster Television Shows?
For fans of monster television shows, several streaming apps offer a wide range of content.
- Netflix:
- Content: Extensive library of TV shows and movies, including popular monster-themed series.
- Features: 4K streaming, offline downloads, and personalized recommendations.
- Hulu:
- Content: Offers a mix of current TV episodes, classic shows, and original content, including monster-themed series.
- Features: Live TV option, personalized recommendations, and multiple user profiles.
- Amazon Prime Video:
- Content: Includes a variety of TV shows and movies, with a growing selection of monster-themed content.
- Features: 4K streaming, offline downloads, and access to Prime Video Channels.
- Disney+:
- Content: Features a vast collection of content from Disney, Pixar, Marvel, Star Wars, and National Geographic, including family-friendly monster shows.
- Features: 4K streaming, offline downloads, and group watch feature.
5.2. Are There Remote Control Apps That Can Improve Navigation?
Remote control apps can significantly improve navigation when your iPad is connected to your TV.
- Apple TV Remote:
- Features: Built-in remote control app for Apple TV, allows you to navigate menus, control playback, and use Siri voice commands.
- Benefits: Seamless integration with Apple devices, easy setup, and intuitive interface.
- Universal Remote Apps:
- Examples: Logitech Harmony, Peel Smart Remote.
- Features: Control multiple devices (TV, sound system, streaming devices) with one app, customizable buttons, and activity-based controls.
- Benefits: Simplifies your entertainment setup, reduces clutter, and provides a unified control experience.
- TV Manufacturer Apps:
- Examples: Samsung SmartThings, LG ThinQ.
- Features: Control your TV directly from your smartphone, access streaming apps, adjust settings, and use voice commands.
- Benefits: Direct control over your TV, access to advanced features, and seamless integration with your smart home ecosystem.
5.3. How Can Video Player Apps Enhance Playback Quality?
Video player apps can enhance playback quality by offering advanced features and customization options.
- VLC Media Player:
- Features: Supports a wide range of video formats, customizable playback settings, and advanced audio and video filters.
- Benefits: Versatile, free, and open-source, offers extensive control over playback settings, and supports streaming from various sources.
- Infuse:
- Features: Elegant interface, supports high-resolution video, automatic metadata fetching, and seamless streaming from network shares.
- Benefits: User-friendly, visually appealing, and optimized for Apple devices, offers a premium playback experience.
- MX Player:
- Features: Supports various video formats, hardware acceleration, subtitle support, and gesture controls.
- Benefits: Lightweight, customizable, and offers advanced features for fine-tuning playback, popular among Android users.
6. How Do I Connect My iPad To A Projector For Presentations?
Connecting your iPad to a projector is useful for presentations, educational purposes, or sharing content with a larger audience.
- HDMI Adapter: Use an HDMI adapter to connect your iPad to the projector via an HDMI cable.
- VGA Adapter: For older projectors, use a VGA adapter to connect your iPad.
- AirPlay: Some projectors support AirPlay, allowing you to wirelessly mirror your iPad’s screen.
- Wired Connection: Use an appropriate cable (e.g., USB-C to HDMI) to directly connect your iPad to the projector.
6.1. What Type Of Adapter Do I Need To Connect To A Projector?
The type of adapter you need depends on the available ports on your projector.
- HDMI Adapter:
- Usage: If your projector has an HDMI port, use an HDMI adapter to connect your iPad.
- Benefits: Supports high-resolution video and audio, widely available and compatible with most projectors.
- VGA Adapter:
- Usage: For older projectors with a VGA port, use a VGA adapter.
- Benefits: Allows you to connect to older projectors, commonly used in educational and professional settings.
- USB-C to HDMI Cable:
- Usage: If your iPad has a USB-C port, use a USB-C to HDMI cable for a direct connection.
- Benefits: Simple and direct connection, supports high-resolution video and audio, and eliminates the need for an adapter.
6.2. What Settings Should I Adjust For Presentations?
Adjusting your iPad’s settings can ensure a smooth and professional presentation experience.
- Do Not Disturb Mode:
- Enable: Turn on Do Not Disturb mode to prevent interruptions from notifications.
- Reason: Ensures that notifications do not disrupt your presentation.
- Orientation Lock:
- Lock: Lock the screen orientation to prevent unwanted rotation.
- Reason: Keeps your presentation stable and prevents the screen from rotating unexpectedly.
- Mirroring Settings:
- Adjust: Ensure that your iPad’s screen is properly mirrored on the projector.
- Reason: Proper mirroring ensures that your audience sees exactly what you intend to show.
- Brightness:
- Adjust: Adjust the brightness of your iPad’s screen to match the projector’s output.
- Reason: Optimal brightness ensures that your presentation is visible and clear to the audience.
6.3. Can I Use AirPlay With A Projector?
Yes, you can use AirPlay with a projector if it supports AirPlay or if you connect an Apple TV to the projector.
- AirPlay-Enabled Projector:
- Connect: Ensure that your projector and iPad are on the same Wi-Fi network and select the projector from the AirPlay menu on your iPad.
- Benefits: Wireless connection, easy setup, and seamless integration with Apple devices.
- Apple TV Connection:
- Connect: Connect an Apple TV to the projector via HDMI and use AirPlay to mirror your iPad’s screen to the Apple TV.
- Benefits: Extends AirPlay capabilities to non-AirPlay projectors, provides a reliable wireless connection, and enhances your presentation experience.
7. How Do I Manage Cables And Connections For A Clean Setup?
Managing cables and connections is essential for a clean and organized setup, especially when connecting your iPad to your TV or projector.
- Cable Management Tools: Use cable ties, clips, and sleeves to keep cables organized and out of sight.
- HDMI Cable Length: Choose the appropriate length of HDMI cable to avoid excess cable clutter.
- Adapter Placement: Position adapters in a way that minimizes strain on the ports.
- Wireless Options: Utilize wireless connections like AirPlay to reduce cable clutter.
- Label Cables: Label each cable to easily identify and manage connections.
7.1. What Are The Best Cable Management Tools?
Various cable management tools can help you keep your setup tidy and organized.
- Cable Ties:
- Usage: Secure and bundle cables together, preventing them from tangling.
- Types: Velcro cable ties, reusable zip ties, and traditional zip ties.
- Benefits: Simple, inexpensive, and effective for organizing cables.
- Cable Clips:
- Usage: Attach cables to surfaces, keeping them out of sight and preventing them from dangling.
- Types: Adhesive cable clips, screw-in cable clips, and magnetic cable clips.
- Benefits: Versatile, easy to install, and can be used on various surfaces.
- Cable Sleeves:
- Usage: Enclose multiple cables in a single sleeve, providing a clean and organized look.
- Types: Braided cable sleeves, neoprene cable sleeves, and spiral wrap cable sleeves.
- Benefits: Protects cables from damage, reduces clutter, and enhances the appearance of your setup.
7.2. How Do I Choose The Right HDMI Cable Length?
Selecting the correct HDMI cable length is essential for a clean and efficient setup.
- Measure Distance:
- Assess: Measure the distance between your iPad and TV or projector.
- Reason: Ensures that you purchase a cable that is long enough to reach both devices without being excessively long.
- Consider Routing:
- Plan: Consider the path the cable will take, including any bends or obstacles.
- Reason: Allows you to account for extra length needed to route the cable around furniture or through walls.
- Avoid Excess Length:
- Minimize: Choose a cable length that is as short as possible while still meeting your needs.
- Reason: Excess cable length can create clutter and increase the risk of tangling.
7.3. How Can I Minimize Strain On Ports?
Minimizing strain on ports can extend the lifespan of your devices and prevent connection issues.
- Support Cables:
- Use Clips: Use cable clips or ties to support cables near the ports.
- Reason: Reduces strain on the ports by preventing the cables from pulling or bending.
- Avoid Bending Cables:
- Route Carefully: Route cables in a way that avoids sharp bends or twists.
- Reason: Sharp bends can damage the cable and the port over time.
- Use Port Savers:
- Connect: Use port savers to provide an extension between the cable and the device.
- Reason: Protects the device’s original port from wear and tear.
- Secure Adapters:
- Placement: Position adapters in a way that minimizes stress on the port.
- Reason: Prevents the adapter from putting excessive weight or pressure on the port.
8. What Are The Benefits Of Joining A Monster Television Community?
Joining a monster television community, like monstertelevision.com, offers numerous benefits for fans of the genre.
- Stay Updated: Get the latest news, reviews, and information about upcoming shows and episodes.
- Share Opinions: Discuss your favorite shows and characters with other fans.
- Discover New Shows: Find recommendations and discover new monster television series to watch.
- Connect With Others: Connect with like-minded individuals who share your passion for monster television.
- Access Exclusive Content: Gain access to exclusive content, such as behind-the-scenes footage and interviews.
8.1. How Can I Stay Updated On The Latest Monster Television News?
Staying updated on the latest monster television news is easy with the right resources.
- Monstertelevision.com:
- Visit: Regularly check monstertelevision.com for the latest news, reviews, and articles about monster television shows.
- Benefits: Comprehensive coverage of the genre, expert insights, and a dedicated community of fans.
- Social Media:
- Follow: Follow monster television-related accounts on social media platforms like Twitter, Facebook, and Instagram.
- Benefits: Real-time updates, breaking news, and direct engagement with creators and fans.
- Newsletters:
- Subscribe: Sign up for newsletters from monster television websites and streaming services.
- Benefits: Receive curated news and updates directly in your inbox.
8.2. How Can I Share My Opinions With Other Fans?
Sharing your opinions with other fans can enhance your viewing experience and foster a sense of community.
- Monstertelevision.com Forums:
- Participate: Join the forums on monstertelevision.com to discuss your favorite shows, characters, and theories.
- Benefits: Dedicated platform for monster television discussions, diverse perspectives, and a supportive community.
- Social Media Groups:
- Join: Join monster television-related groups on Facebook, Reddit, and other social media platforms.
- Benefits: Large and active communities, diverse opinions, and easy sharing of content.
- Comment Sections:
- Engage: Leave comments on articles, reviews, and videos related to monster television.
- Benefits: Direct engagement with content creators, opportunity to share your thoughts, and exposure to new ideas.
8.3. Where Can I Find Recommendations For New Monster Television Shows?
Finding recommendations for new monster television shows can help you discover hidden gems and expand your viewing horizons.
- Monstertelevision.com Reviews:
- Read: Explore the reviews section on monstertelevision.com for expert recommendations and insights.
- Benefits: Comprehensive reviews, diverse opinions, and curated content for monster television fans.
- Streaming Service Recommendations:
- Browse: Check the recommendations and curated lists on streaming services like Netflix, Hulu, and Amazon Prime Video.
- Benefits: Personalized recommendations based on your viewing history, easy access to new content, and diverse selection of monster television shows.
- Community Forums:
- Ask: Ask for recommendations in monster television community forums and social media groups.
- Benefits: Personalized recommendations from fellow fans, opportunity to discover hidden gems, and diverse perspectives.
9. What Are Some Tips For An Immersive Viewing Experience?
Creating an immersive viewing experience can significantly enhance your enjoyment of monster television shows.
- Create a Comfortable Environment: Set up a cozy and inviting viewing space with comfortable seating and good lighting.
- Use Quality Audio Equipment: Invest in a good sound system or headphones for immersive audio.
- Minimize Distractions: Turn off lights, silence your phone, and eliminate other distractions.
- Adjust Screen Settings: Calibrate your TV or projector for optimal picture quality.
- Engage With the Content: Pay attention to the details, immerse yourself in the story, and discuss the show with other fans.
9.1. How Do I Create A Comfortable Viewing Environment?
Creating a comfortable viewing environment is essential for an immersive experience.
- Seating:
- Choose: Select comfortable seating, such as a couch, recliner, or beanbag chair.
- Reason: Comfortable seating allows you to relax and enjoy the show without distractions.
- Lighting:
- Adjust: Dim the lights or use ambient lighting to reduce glare and eye strain.
- Reason: Proper lighting enhances the viewing experience and creates a more immersive atmosphere.
- Temperature:
- Maintain: Maintain a comfortable room temperature to prevent discomfort.
- Reason: A comfortable temperature allows you to focus on the show without being distracted by the environment.
- Decor:
- Personalize: Add personal touches, such as posters, artwork, or themed decorations.
- Reason: Personalizing the viewing space creates a more inviting and enjoyable atmosphere.
9.2. What Audio Equipment Enhances The Viewing Experience?
Quality audio equipment can significantly enhance your viewing experience.
- Sound System:
- Invest: Invest in a surround sound system for immersive audio.
- Benefits: Provides a more realistic and engaging sound experience.
- Headphones:
- Choose: Use noise-canceling headphones to block out distractions.
- Benefits: Allows you to focus on the audio without being disturbed by external sounds.
- Soundbar:
- Install: Install a soundbar to improve the audio quality of your TV.
- Benefits: Enhances the clarity and depth of the sound, providing a more immersive experience.
9.3. How Do I Minimize Distractions During Viewing?
Minimizing distractions is crucial for an immersive viewing experience.
- Silence Phone:
- Turn Off: Turn off your phone or put it on silent mode.
- Reason: Prevents interruptions from calls, texts, and notifications.
- Turn Off Lights:
- Dim: Dim the lights or turn them off completely.
- Reason: Reduces glare and creates a more immersive atmosphere.
- Eliminate Noise:
- Close Doors: Close doors and windows to block out external noise.
- Reason: Creates a quieter environment for better focus on the audio.
- Inform Others:
- Notify: Inform family members or roommates that you are watching a show and do not want to be disturbed.
- Reason: Prevents interruptions and allows you to fully immerse yourself in the viewing experience.
10. What Are Some Advanced Techniques For Enhancing Connectivity?
For users looking to optimize their connectivity further, several advanced techniques can enhance the connection between your iPad and TV.
- Use a Wi-Fi Extender: Improve Wi-Fi coverage in your viewing area with a Wi-Fi extender.
- Optimize Router Settings: Adjust router settings for optimal performance, such as QoS (Quality of Service).
- Use a Wired Connection: Use a wired Ethernet connection for a more stable and reliable connection.
- Upgrade Hardware: Upgrade your iPad, TV, or adapter for better performance and compatibility.
- Use a Streaming Device: Use a dedicated streaming device like Apple TV or Roku for enhanced features and performance.
10.1. How Can A Wi-Fi Extender Improve Connectivity?
A Wi-Fi extender can improve connectivity by extending the range of your Wi-Fi network.
- Placement:
- Position: Place the Wi-Fi extender in a location that is halfway between your router and your viewing area.
- Reason: Extends the range of the Wi-Fi signal to reach your viewing area more effectively.
- Setup:
- Connect: Connect the Wi-Fi extender to your existing Wi-Fi network.
- Reason: Allows the extender to rebroadcast the Wi-Fi signal, providing better coverage.
- Configuration:
- Optimize: Configure the extender to use the same network name and password as your existing Wi-Fi network.
- Reason: Creates a seamless transition between the router and the extender, ensuring continuous connectivity.
10.2. What Router Settings Optimize Streaming Performance?
Adjusting your router settings can optimize streaming performance.
- Quality of Service (QoS):
- Enable: Enable QoS settings on your router.
- Configure: Prioritize streaming traffic to ensure smooth playback.
- Reason: Allocates more bandwidth to streaming devices, reducing buffering and lag.
- Channel Selection:
- Choose: Select a less crowded Wi-Fi channel.
- Reason: Reduces interference from other devices, improving signal quality.
- Firmware Updates:
- Update: Keep your router’s firmware up to date.
- Reason: Firmware updates often include performance improvements and bug fixes.
- Guest Network:
- Separate: Create a separate guest network for non-essential devices.
- Reason: Reduces the load on your main network, improving streaming performance.
10.3. How Does A Dedicated Streaming Device Enhance Connectivity?
A dedicated streaming device can enhance connectivity by providing optimized hardware and software for streaming.
- Hardware Optimization:
- Dedicated: Streaming devices are designed specifically for streaming, with optimized hardware for decoding and playback.
- Reason: Provides smoother and more reliable streaming performance compared to using a general-purpose device like an iPad.
- Software Optimization:
- **Optimized