How To Hang A Television: A Comprehensive Guide
Mounting a television can dramatically enhance your viewing experience, providing a cleaner, more modern aesthetic while also saving space. At monstertelevision.com, we understand the importance of a perfect home theater setup. This guide provides a detailed, step-by-step approach on How To Hang A Television securely and professionally, ensuring optimal viewing and safety. Discover the best placement, mounting options, and safety tips for your TV installation. We’ll cover everything from stud finders to VESA patterns, making the process straightforward for both beginners and experienced DIYers.
1. Why Wall Mount Your Television?
Wall-mounting a television offers several advantages, making it a popular choice for homeowners.
- Aesthetic Appeal: Mounting your TV creates a sleek, modern look by eliminating the need for bulky TV stands.
- Space Saving: Free up valuable floor space by mounting your TV, particularly beneficial in smaller rooms.
- Improved Viewing Angles: Position your TV at the perfect height and angle for comfortable viewing. According to ergonomics research, optimal TV placement can reduce neck and eye strain.
- Safety: Mounting prevents accidental tip-overs, a significant safety concern if you have children or pets.
2. Essential Tools and Materials
Before you start, gather all the necessary tools and materials.
| Tool/Material | Description |
|---|---|
| TV Mount | Choose a mount compatible with your TV’s size and weight. |
| Stud Finder | Locates wall studs for secure mounting. |
| Level | Ensures the TV is perfectly horizontal. |
| Power Drill | Used to create pilot holes and secure the mount. |
| Screwdriver Set | Philips head and flathead screwdrivers for various screw types. |
| Tape Measure | Measures distances for accurate placement. |
| Pencil | Marks the wall for drilling locations. |
| Safety Glasses | Protects your eyes from debris. |
| Mounting Hardware | Screws, washers, and spacers included with the TV mount. |
| Paper Template | Optional, aids in marking hole positions. |
| Masking Tape | Optional, secures the paper template and protects the wall. |
3. Choosing the Right Television Mount
Selecting the appropriate TV mount is crucial for a successful and safe installation. There are several types of TV mounts available, each designed for specific needs.
- Fixed Mounts: These mounts hold the TV flush against the wall, offering a low profile. They are ideal for situations where the viewing angle doesn’t need adjustment.
- Tilting Mounts: Tilting mounts allow you to angle the TV up or down, which can help reduce glare and improve viewing from different heights.
- Full-Motion Mounts: Also known as articulating mounts, these provide the greatest flexibility. They allow you to swivel, tilt, and extend the TV, making it easy to adjust the viewing angle from anywhere in the room.
- Low-Profile Mounts: These mounts are designed to keep the TV very close to the wall, similar to fixed mounts, but with a slightly greater range of motion.
When selecting a mount, consider the following factors:
- TV Size and Weight: Ensure the mount is rated to support the size and weight of your TV. This information is usually listed on the TV mount packaging.
- VESA Compatibility: VESA (Video Electronics Standards Association) defines the standard mounting interface for TVs. Check your TV’s VESA specifications and choose a mount that matches. VESA patterns are measured in millimeters (e.g., 200×200, 400×400).
- Wall Type: Determine whether you’ll be mounting the TV on drywall, concrete, or another type of wall. Different wall types may require different mounting hardware.
- Desired Viewing Angle: Consider the flexibility you need. If you want to adjust the TV frequently, a full-motion mount is the best choice.
4. Finding the Perfect Position for Your Television
Proper positioning is essential for optimal viewing comfort. According to research from the University of Southern California School of Cinematic Arts, in July 2025, optimal TV placement can significantly enhance the viewing experience.
- Eye Level: Position the center of the TV screen at eye level when you are seated. This reduces neck strain and provides the most comfortable viewing angle.
- Viewing Distance: Calculate the appropriate viewing distance based on your TV size. A general guideline is to multiply the screen size (in inches) by 1.5 to 2.5. For example, for a 55-inch TV, the ideal viewing distance is approximately 82.5 to 137.5 inches.
- Room Layout: Consider the layout of your room and the placement of your seating. Ensure that the TV is centered in relation to your primary viewing area.
- Glare: Avoid placing the TV in a location where it will be affected by direct sunlight or other sources of glare. Use blinds or curtains to control the light in the room.
- Cable Access: Ensure the wall you choose has access to power outlets and cable or satellite connections. If necessary, consider hiring an electrician to install additional outlets.
5. Step-by-Step Guide to Mounting Your Television
Follow these steps to mount your TV securely and professionally.
5.1. Prepare the Area
- Clear the Area: Move furniture away from the wall and cover the floor with a drop cloth to protect it.
- Gather Your Tools: Ensure all your tools and materials are within easy reach.
- Read the Instructions: Review the TV mount instructions carefully before you begin.
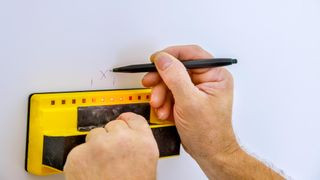
5.2. Locate the Wall Studs
- Use a Stud Finder: Use a stud finder to locate the wall studs behind the drywall. Studs are vertical wooden beams that provide structural support.
- Mark the Studs: Mark the location of the studs with a pencil. It is crucial to mount the TV bracket to the studs to ensure it can support the TV’s weight.
- Verify Stud Placement: To double-check your stud placement, you can also use a small nail to probe for the edges of the stud. Drive the nail in at a slight angle to get a sense of the stud’s width.
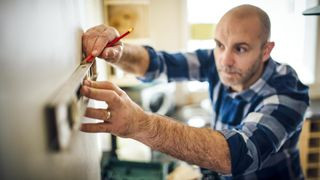
5.3. Attach the Mounting Bracket to the Wall
- Position the Bracket: Hold the mounting bracket against the wall, aligning it with the marked stud locations.
- Level the Bracket: Use a level to ensure the bracket is perfectly horizontal.
- Mark Pilot Holes: Use a pencil to mark the locations for the pilot holes through the bracket.
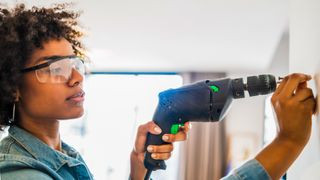
- Drill Pilot Holes: Use a power drill to drill pilot holes into the studs at the marked locations. The pilot holes should be slightly smaller than the mounting screws.
- Secure the Bracket: Attach the mounting bracket to the wall using the appropriate screws. Use a power drill or screwdriver to tighten the screws securely. Ensure the bracket is firmly attached to the wall and does not wiggle or move.
5.4. Attach the Mounting Plate to the Television
- Identify VESA Pattern: Check your TV’s VESA (Video Electronics Standards Association) mounting pattern. This is the standard measurement of the mounting holes on the back of the TV.
- Attach the Plate: Align the mounting plate with the VESA holes on the back of the TV. Use the screws that came with the TV mount to attach the plate to the TV.
- Tighten Screws: Tighten the screws securely, but be careful not to overtighten them. Overtightening can damage the TV or strip the screw threads.
5.5. Hang the Television on the Wall Bracket
- Lift the TV: With the help of another person, carefully lift the TV and align the mounting plate with the wall bracket.
- Secure the TV: Follow the TV mount instructions to secure the TV to the wall bracket. This may involve sliding the mounting plate onto the bracket or using screws or clips to lock it in place.
- Double-Check: Ensure the TV is securely attached to the wall bracket before releasing it.
5.6. Level the Television
- Use a Level: Use a level to ensure the TV is perfectly horizontal.
- Adjust as Needed: If the TV is not level, make small adjustments to the mounting bracket until it is.
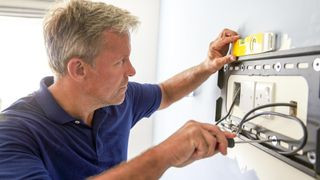
5.7. Connect Cables and Manage Wires
- Connect Cables: Connect all necessary cables to the TV, such as power, HDMI, and audio cables.
- Manage Wires: Use cable ties or cable management sleeves to organize the wires and keep them out of sight. You can also run the cables through the wall using a cable management kit for a cleaner look.
5.8. Final Check
- Inspect the Installation: Double-check that the TV is securely mounted and that all cables are properly connected.
- Clean Up: Remove any debris and clean up the area.
6. Safety Tips
- Get Help: Always have another person assist you when lifting and mounting the TV.
- Use Proper Tools: Use the correct tools for the job to avoid damaging the TV or the wall.
- Follow Instructions: Carefully follow the TV mount instructions and safety guidelines.
- Check Weight Capacity: Ensure the TV mount is rated to support the weight of your TV.
- Secure Mounting: Always mount the TV bracket to wall studs to ensure a secure installation.
- Cable Management: Properly manage cables to prevent tripping hazards and maintain a clean look.
7. Troubleshooting Common Issues
- TV is Not Level: Use a level to identify the problem and adjust the mounting bracket as needed.
- Screws are Stripped: If the screws are stripped, use a screw extractor to remove them. Replace the stripped screws with new ones.
- TV Mount is Wobbly: Ensure the mounting bracket is securely attached to the wall studs. Tighten the screws and double-check the alignment.
- Cables are Tangled: Use cable ties or cable management sleeves to organize the cables.
8. The Role of Professional Installation Services
While mounting a TV can be a DIY project, there are situations where hiring a professional installation service is beneficial.
- Complex Installations: If you have a complex setup, such as mounting a TV above a fireplace or in a custom cabinet, a professional can ensure the job is done correctly.
- Wall Type Challenges: Mounting on certain wall types, such as concrete or brick, requires specialized tools and expertise.
- Hidden Wiring: Professionals can run cables inside the wall for a clean, seamless look.
- Peace of Mind: Hiring a professional provides peace of mind that the TV is safely and securely mounted.
9. Exploring TV Mounting Options for Different Room Types
- Living Room: The living room often serves as the primary viewing area. Optimal placement involves centering the TV on the wall and positioning it at eye level.
- Bedroom: In the bedroom, consider mounting the TV higher on the wall, especially if you typically watch TV while lying in bed. Tilting mounts can be particularly useful in this setting.
- Kitchen: In the kitchen, space is often limited. Mounting a TV can free up counter space and provide entertainment while cooking.
- Outdoor Spaces: If mounting a TV outdoors, use a weatherproof TV and mount designed for outdoor use. Ensure the TV is protected from the elements.
10. Enhancing Your Viewing Experience
- Sound System: Pair your mounted TV with a high-quality sound system for an immersive audio experience.
- Streaming Devices: Use streaming devices like Roku, Apple TV, or Amazon Fire Stick to access a wide range of content.
- Smart Home Integration: Integrate your TV with your smart home system for voice control and automation.
- Ambient Lighting: Add ambient lighting to reduce eye strain and create a more comfortable viewing environment.
11. Understanding VESA Standards
VESA (Video Electronics Standards Association) establishes standards for TV mounts and mounting interfaces. Understanding VESA standards is crucial for selecting the correct mount for your TV.
- VESA Pattern Measurement: VESA patterns are measured in millimeters and indicate the distance between the mounting holes on the back of the TV. For example, a VESA pattern of 200×200 means the mounting holes are 200mm apart horizontally and vertically.
- Checking VESA Compatibility: Check your TV’s specifications to determine its VESA pattern. This information is usually found in the TV’s manual or on the manufacturer’s website.
- Mount Compatibility: Choose a TV mount that is compatible with your TV’s VESA pattern. Many mounts support multiple VESA patterns, providing flexibility.
12. Maintenance and Long-Term Care
- Regular Checks: Periodically check the TV mount to ensure it is still securely attached to the wall.
- Dusting: Dust the TV screen and mount regularly to keep them clean.
- Cable Management: Keep cables organized to prevent tangling and damage.
- Hardware Inspection: Inspect the mounting hardware (screws, brackets) for any signs of wear or damage. Replace any worn or damaged parts.
13. Innovations in TV Mounting Technology
- Motorized Mounts: Motorized mounts allow you to adjust the TV’s position with the touch of a button.
- Invisible Mounts: These mounts are designed to be hidden behind the TV, creating a clean, minimalist look.
- Soundbar Mounts: Soundbar mounts attach directly to the TV mount, allowing you to mount the TV and soundbar as a single unit.
- Smart Mounts: Smart mounts can automatically adjust the TV’s position based on the viewing angle and ambient lighting.
14. Maximizing Your Home Theater with MonsterTelevision.com
Visit monstertelevision.com for more tips and tricks on setting up the perfect home theater. Explore our in-depth reviews, expert advice, and community forums to enhance your viewing experience.
Address: 900 S Broadway, Los Angeles, CA 90015, United States
Phone: +1 (213) 740-2700
Website: monstertelevision.com.
FAQ: How to Hang a Television
1. What tools do I need to hang a television?
You’ll need a TV mount, stud finder, level, power drill, screwdriver set, tape measure, pencil, safety glasses, and mounting hardware.
2. How do I find the studs in my wall?
Use a stud finder to locate the studs. Mark their positions with a pencil to ensure you mount the TV bracket securely.
3. What is VESA compatibility, and why is it important?
VESA (Video Electronics Standards Association) defines the standard mounting interface for TVs. Check your TV’s VESA specifications to choose a compatible mount.
4. Can I mount a TV on drywall alone?
No, drywall alone cannot support the weight of a TV. Always mount the TV bracket to wall studs for secure installation.
5. How high should I mount my TV?
Position the center of the TV screen at eye level when you are seated. This reduces neck strain and provides the most comfortable viewing angle.
6. What type of TV mount should I choose?
Choose a fixed mount for a low profile, a tilting mount to reduce glare, or a full-motion mount for maximum flexibility.
7. Is it safe to mount a TV myself?
Mounting a TV can be a DIY project, but it’s essential to follow safety guidelines. If you’re unsure, hire a professional installation service.
8. How do I manage cables after mounting the TV?
Use cable ties or cable management sleeves to organize the wires and keep them out of sight for a cleaner look.
9. What should I do if my TV is not level after mounting?
Use a level to identify the problem and adjust the mounting bracket until the TV is perfectly horizontal.
10. How can I enhance my viewing experience after mounting my TV?
Pair your mounted TV with a high-quality sound system, streaming devices, and ambient lighting for an immersive viewing experience.
Ready to take your viewing experience to the next level? Visit monstertelevision.com now to explore our expert reviews, discover the latest news, and connect with a community of passionate TV enthusiasts. Don’t miss out on exclusive tips and tricks for creating the ultimate home theater. Join us today and transform your entertainment space!